Scaling Node.js Backend That Uses WebSockets

This post assumes you already know how to write a node.js backend and how to use docker.
Overview
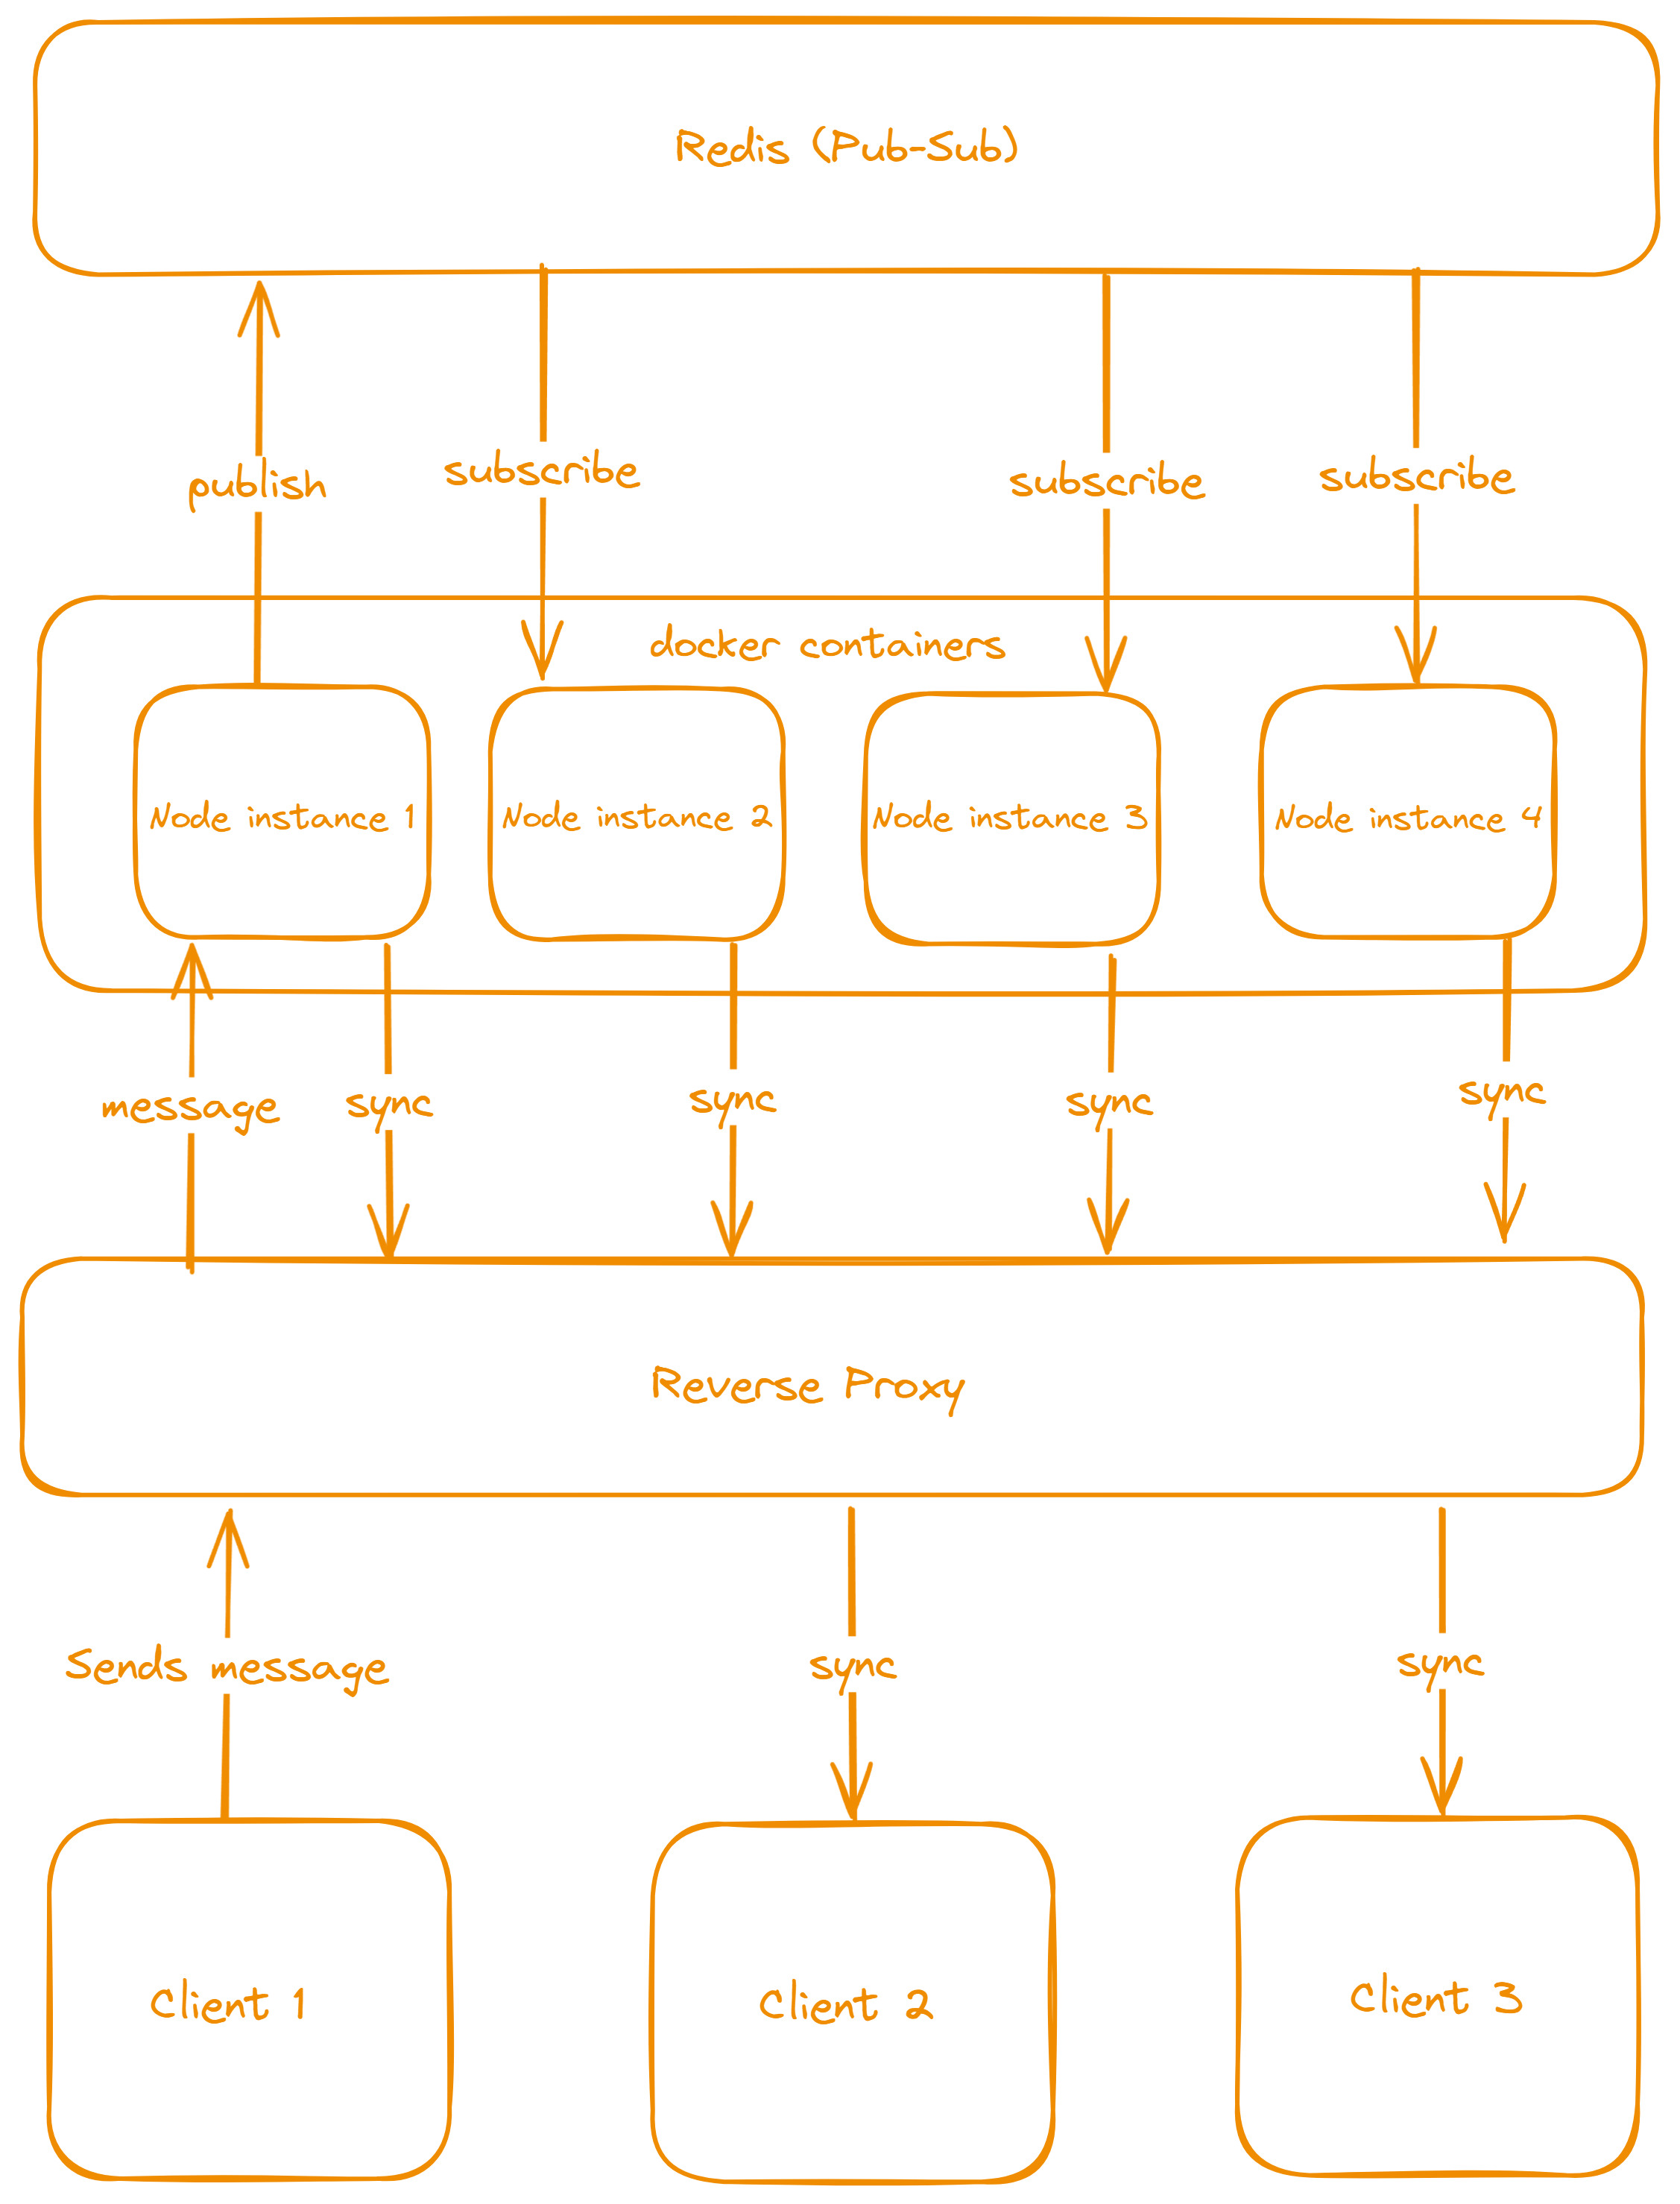
In this brief tutorial, we'll be using fastify, docker, redis, and caddy to simulate horizontal scaling. If you don't know any of these technologies, I recommend you read about them first. We'll implement a Pub-Sub architecture that will look as follows:

The clients are connected to different instances of node.js running on different ports inside a docker container, this is called clustering. Caddy sits between the client and the node.js instances as a reverse proxy to handle traffic and balance the load between instances. In order for all the instances to be in sync with each other, the message sent by client 1 to node instance 1 needs to be made known by all the other instances.
Setting up fastify
Make sure to not use a static port and create a port inside your environment variables that we'll use later to run the server on multiple ports.
Create a main.ts file inside a ./src folder. Here's how your main file should look like:
import Fastify, { FastifyInstance } from "fastify";
import { Server } from "socket.io";
import io from "fastify-socket.io";
import Redis from "ioredis";
import { randomUUID } from "crypto";
import cors from "@fastify/cors";
import dotenv from "dotenv";

dotenv.config();

const port = parseInt(process.env.PORT || "8080", 10);
const host = process.env.HOST || "0.0.0.0";
const redis_url = process.env.REDIS_URL;
const origin = process.env.ORIGIN || "http://localhost:3000";

declare module "fastify" {
  interface FastifyInstance {
    io: Server;
  }
}

if (!redis_url) {
  console.error("missing REDIS_URL!");
  process.exit(1);
}

const app: FastifyInstance = Fastify();
const publisher = new Redis(redis_url);
const subscriber = new Redis(redis_url);

async function build() {
  await app.register(cors, {
    origin: origin,
  });

  await app.register(io);

  app.io.on("connection", (io) => {
    console.log("connected");
    io.on("new-message", async ({ message }: { message: string }) => {
      if (!message) {
        return;
      }
      console.log("received", message);
      await publisher.publish("new-message", message);
    });
  });

  subscriber.on("message", (channel, message) => {
    if (channel === "new-message") {
      app.io.emit("new-message", {
        message: message,
        id: randomUUID(),
        createdAt: new Date(),
        port: port,
      });
      return;
    }
  });

  app.get("/", async function handler(_, reply) {
    reply.status(200).send({ message: "Welcome to my server! 🎉", port: port });
  });
}

async function main() {
  await build();

  try {
    app.listen({ host: host, port: port });

    console.log(`server listening on: http://${host}:${port}`);
  } catch (e) {
    console.error("Server error: ", e);
    process.exit(1);
  }
}

main();
Now configure your environment variables as follows:
HOST = "0.0.0.0"
PORT = "8080"
ORIGIN = "your client url"
REDIS_URL = "your redis url"
You can set up a docker container for redis or use a redis provider.
With this we created a small real-time messaging application using socket.io.
Setting up docker
In the root directory, create a Dockerfile and configure as follows:
FROM node:18-alpine AS base

# Stage 1 - Build the base
FROM base AS deps
RUN apk add --no-cache libc6-compat
WORKDIR /app

# Install dependencies based on the preferred package manager
COPY package.json package-lock.json tsconfig*.json ./
COPY src ./src
RUN npm ci

# Stage 2 - Build the app
FROM base AS builder
WORKDIR /app
COPY --from=deps /app/node_modules ./node_modules
COPY . .
RUN npm run build
RUN rm -rf node_modules

# Stage 3 - Production
FROM base as runner
WORKDIR /app
ENV NODE_ENV production
COPY package*.json ./
COPY --from=builder /app/dist ./
RUN npm install --only-production

CMD ["node", "main.js"]
Now create a docker-compose.yml file and configure it as follows:
version: "3"

services:
  chat-app-1:
    build:
      context: .
      dockerfile: Dockerfile
    ports:
      - "8080:8080"
    env_file:
      - .env
    environment:
      - PORT=8080
      - ORIGIN=${ORIGIN}
      - REDIS_URL=${REDIS_URL}

  chat-app-2:
    build:
      context: .
      dockerfile: Dockerfile
    ports:
      - "4000:4000"
    env_file:
      - .env
    environment:
      - PORT=4000
      - ORIGIN=${ORIGIN}
      - REDIS_URL=${REDIS_URL}

  chat-app-3:
    build:
      context: .
      dockerfile: Dockerfile
    ports:
      - "5000:5000"
    env_file:
      - .env
    environment:
      - PORT=5000
      - ORIGIN=${ORIGIN}
      - REDIS_URL=${REDIS_URL}

  caddy:
    image: caddy/caddy:2.7.3-alpine
    container_name: caddy-server
    restart: unless-stopped
    ports:
      - "80:80"
      - "443:443"
    volumes:
      - $PWD/Caddyfile:/etc/caddy/Caddyfile
      - $PWD/site:/srv
      - caddy_data:/data
      - caddy_config:/config

volumes:
  caddy_data:
  caddy_config:
Docker compose is now configured to run 3 node.js instances each on its own port and our caddy proxy inside the docker image. The port of 80:80 and 443:443 are http and https respectively. Assigning these ports to caddy will make sure it works as intended.
Setting up Caddy
After you're done configuring Docker, now we'll configure our reverse proxy.
Start by creating a Caddyfile in your root directory and then add the following:
{
    debug
}

http://127.0.0.1 {
    reverse_proxy chat-app-1:8080 chat-app-2:6060 chat-app-3:5050 {
        header_down Strict-Transport-Security max-age=31536000
    }
}
This will create a load balancer that will be used to forward traffic to one of the three instances of node.js inside docker.
Last step
In order to start this docker image, you need to run the following command:
docker-compose up
curl http://127.0.0.1
You can use postman to test your application instead of curl by using the configured url inside Caddyfile (http://127.0.0.1).
NOTE
This post is intended to give a small example of how to scale node.js that is reliant on websockets in production grade applications. This doesn't cover how to create multiple severs on different machines as that will take longer to complete but it gives you an idea of how that would look like.